Showing posts with label History of Sewing. Show all posts

Friday, February 20, 2015

History of Sewing - De-Mystifying Unprinted Patterns

Sewing with unprinted patterns sounds intimidating to many sewists, especially those new to vintage sewing. So to help de-mystify these vintage patterns that have no ink on them, I thought it might be helpful to clarify what is meant by "unprinted" pattern pieces.

First, unprinted does NOT mean completely blank! What unprinted means is that instead of ink, all sewing indicators are marked on each pattern piece with perforations. It is as simple as that! (relatively speaking ;)

Also, unprinted pattern pieces are universally precut. That means there is nothing to cut away (as you do in modern patterns).

Perforations Instead of Printed Indicators


So the key thing to understand when working with unprinted patterns is the meaning of the perforations. The  information that you find on a typical printed pattern indicates:
  • Notches for matching pieces together
  • Placement of a piece on the fold of the fabric 
  • Placement on the straight of grain of the fabric
  • Folds for darts, pleats, tucks, and hemline and position of natural waistline
  • Seam allowance
Now just take each of those printed elements and re-imagine them through the use of perforations on the unprinted pattern piece.

Notches


Notches are the equivalent of diamonds on modern patterns. Match up single notches with single notches and double notches with double notches.

Single notch


Matching Notches


Placement on the Fold of the Fabric


Three circles forming a triangle indicate that this side is to be placed on the fold of the fabric.


However, some pattern makers chose not to use the 3-circle-triangle to indicate placement on the fold. Instead, three (or even two) circles in a row (rather than in a triangle) represents the side to place on the fold of the fabric.


The instructions will clarify which perforations indicate placement on the fold.

I have used red arrows in this image to point out notches and what they match to. Blue lines circle the three circles that form a triangle and indicate to place that side on the fold of the fabric.


Two circles here represent the placement on the fabric fold (blue circles):


Placement on the Straight of Grain


Pairs of one, two or three circles  (usually large circles, but not always) in a row along the center length of the piece indicate the straight of grain (or straight of goods) for the piece. The placement on the straight of grain is always defined in the instructions.


Another example of single circles in a row that indicate the straight of grain:


To indicate the straight of grain, this pattern uses three sets of three small circles in a row for pieces 3 and 6, while two sets of three small circles suffice for pieces 4 and 1. Pieces 2, 5, and 7 don't need the straight of grain indicated because they are placed on the fold, as indicated by the triangle of circles on one side


You'll notice in these examples that patterns vary in how detailed they explain the meanings of the perforations in the illustrated list of pattern pieces. In all cases, though, the sewing instructions are very clear.

Darts, Pleats, Tucks and More


These various perforations are used to indicate different things, depending on the manufacturer. They are typically explained in the pattern's instructions.


  • Folds for darts
  • Folds for pleats or tucks
  • Natural waistline
  • Placement of buttonholes
Perforations for a dart form a triangle that looks like a dart and is placed where you expect it.

Folds for pleats or tucks are parallel rows of circles, sometimes the same size, sometimes alternating rows of large and small circles. To form the pleat or tuck, you fold the fabric so that one row of circles aligns with the next row.

The natural waistline is often indicated in dresses or blouses that extend below the waistline. This allows you to adjust the pattern as needed so that it fits properly for your waistline.

Placement of buttonholes are also indicated with perforations, usually pairs of small circles.

Hemlines


Sometimes hemlines are "allowed" for in the pattern pieces, but sometimes they are not! Especially with wartime unprinted patterns (in the 1940s when paper was at a premium), it was not unusual for the pattern pieces to omit an hemline allowance altogether. So be sure to read the instructions to determine whether the pattern pieces do or do not include a hem allowance. If they do not, you will have to extend the pattern at the hemline end for the length of hem that you would like.

Seam Allowance


Most pattern companies are content with simply stating the seam allowance on the instruction sheet. Occasionally (I have only seen this with unprinted Vogue and Hollywood patterns) a series of small circles around the outer edge of each pattern piece represents the seam allowance. And unless the pattern states otherwise, the seam allowance is designed into each pattern piece. This means you do not have to add any seam allowance when cutting each pattern piece.


Especially in unprinted, precut patterns, the seam allowance is not standardized. Sometimes the pattern instructions will state that all seam allowances are 1/2 inch. Or that the seam allowance is 3/4 inch at underarms and 1/2 inch on all other edges. So always be sure to check the instruction sheet thoroughly for the seam allowance.


Here is what the pattern piece would look like with perforations for seam allowance.


Here is how it would appear for the entire pattern:


Another example:


Well, that's it for now! I am sure that no matter how long I have labored with this post (off and on for a very long time), as soon as I post it, I will think of things I forgot to mention, Well, that will be material for a follow-up post!

Hopefully you now feel armed to sew with vintage unprinted patterns, whether or not you have previously sewn with modern patterns. Just be sure to read the instructions thoroughly before you begin! And I am happy to answer questions. :)

Saturday, July 26, 2014

1920s Foundation Garments - The Tunic Dress Foundation Slip

Think "skirt to be worn with a tunic-length top" and you have the essence of the 1920s tunic-dress foundation slip. This type of foundation slip is needed for what is called a tunic dress (tunic dress example). The slip top is a modification of the camisole top, while the slip bottom is a wide band of the dress fabric deep enough to prevent the upper part of the foundation slip from showing when worn.


To create a tunic-dress foundation slip, start with a plain slip pattern with a camisole top. Take in excess fullness at the hip line with darts (as at a in the image below). Use French seams under the arms and finish the neckline with lace edging. Cut the slip at the length the dress fabric is to be attached. Sew the dress fabric to slip and hem. Voila! You have a tunic-dress foundation slip.


And this concludes my series on 1920s foundation garments! I hope you found it informative and useful. :)

Saturday, July 19, 2014

1920s Foundation Garments - Coat Dress Foundation Slip

What makes a coat-dress foundation slip different from the other foundation slips (plain and tunic-dress) is the creation of sections of the slip using the dress material that can be viewed purposefully or inadvertently. The coat-dress foundation slip (illustrated below) is created for use with a coat dress that opens at the side front. By using dress fabric in a band at the bottom and up the side opening, it ensures that the skirt, when swinging open, does not show a contrasting material. Likewise, a vestee of the dress material is attached at the neckline so that it reveals the same fabric at the neckline.


When sewing a coat-dress foundation slip, start with the plain foundation slip (the small figure on the right). Outline the sections for the dress material on the plain slip pattern and then trace to other paper to create a pattern. The lower band replaces the slip lower section so seam allowances need to be added. But the vestee forms an additional layer on the foundation slip, attaching with snaps.

The coat-dress foundation slip can have a round neckline, a square neckline, even a camisole neckline, as needed. As always, adjust the slip to fit the requirements of the coat-dress.


Tuesday, July 15, 2014

1920s Foundation Garments - The Plain Foundation Slip

The plain foundation slip is really an elongation of the built-up waist lining, with pleats added at the sides over the hips for ease. When putting together your 1920s wardrobe, keep in mind that the plain foundation slip takes just under 3 yards for the average figure! Choose a firm but smooth fabric. If the dress fabric is sheer, a slip of the dress material is preferable.

The following image illustrates a typical 1920s plain foundation slip. This kind of slip can be made with a camisole top if the dress in which it is to be used requires it.


The upper part of the slip is fitted in the same manner as the built-up waist lining, with fitting in any excess waistline fullness by deepening the side seams.  French seams are used in the side seams from the armholes to the hips, which then release into pleats to the hemline. Stitch across the top of each pleat  (as shown) to secure the pleats. Armholes and neckline should be finished with narrow seams.

And that's it! With the exception of the side pleats, the plain foundation slip looks very similar to slips of later decades. Next in this series will be the coat-dress foundation slip!

Friday, July 11, 2014

History of Sewing: 1920s Foundation Garments - Foundation Slips

It's time to return to my series on 1920s foundation garments, and examine the remaining type of foundation garment, the foundation slip. Along with camisoles, the slip is perhaps the most enduring of foundation garments. There are three categories of foundation slips:
  • Plain foundation slip (look familiar?)
  • Coat-dress foundation slip
  • Tunic-dress foundation slip

 Plain foundation slip

The foundation slip offers protection to the dress, or serves as a foundation to which some part of the dress may be attached (similar to the waist linings). Slips eliminate any unsightly break at the waistline under a dress of sheer material, and can intensify the color of the sheer dress.

In the 1920s (and beyond), the preferred slip was made of silk or rayon (rather than cotton, for example), which provides smoothness so the dress slips over them easily, and prevents the slip from crowding up over the knees. Some things don't change, eh?

In my next posts on this topic, I will provide more details about each foundation slip type. Stay tuned!

Tuesday, June 17, 2014

History of Sewing: 1920s Foundation Garments - A Close Look at Close-Fitting Linings

Are you less than slender? Or you simply want to wear a close-fitting frock? In  the 1920s, the "stout" woman or those who wanted to wear something more snugly fitted, the close-fitting lining was the foundation garment required.

The close-fitting lining (in contrast to waist linings and built-up linings) has lightly shaped seams along princess lines, and either a side-front or center front closing. Like the camisole linings and built-up linings, the close-fitting linings have two lengths.


When sewing your own close-fitting lining, start with a basic pattern. When fitting the sections of the lining by basting, fold and pin under the hem allowance along the intended closing, as at (a) in figure 12. If the lining is too loose, pin the seams deeper, as at (b) in figure 12. It is especially important in a close-fitting lining that the armholes be comfortably loose, since there is very little fullness or "give." So mark them where you think they should be trimmed deeper, as at (c) in figure 12.


When sewing the lining, you would sew hooks and eyes 1-1/2 or 2 inches apart along the closing, and then use bias binding or narrow hems to finish the neckline and armholes.

Was this fun? Next topic in this series - foundation slips!

Monday, June 9, 2014

History of Sewing - Exploring the Use of 1920s Foundation Linings

In reading about the use of foundation linings in the 1920s, such as the camisole lining (also called a bodice lining), the built-up lining (also called a plain-waist lining), and the close-fitting lining, there is a consistent mention of "attaching a skirt to the lining". This is particularly in the case of two-piece dresses which have tops of the overblouse style or a bloused effect, and where skirts (since they frequently rest at the hips or below) need a foundation of some kind to keep them in place.

Here is an image of a skirt attached to a long-waisted camisole lining, with blouse removed. This was common because so many of the popular blouses and sweaters were of the overblouse type. Attaching the skirt to a lining provided a nice straight line.


It was considered smart (especially if the skirt was not of a washable fabric) to have the lining made so that it could be removed and washed. Snaps on the bottom of the lining and the band of the skirt was a recommended method. Hooks-and-eyes were also a popular method. These methods allowed the lining to be removed and replaced with a minimum of effort. Often the foundation lining would be made in a similar color or trimmed with lace so that the overblouse could be sheer, or so that an overblouse could even be omitted when worn under a sweater.

Very often a pattern for a camisole lining was included with the pattern for the dress with which it was to be used. The lining can be easily cut without a pattern, however.

1920s "sports skirts" with the blouse worn "bloused"

Several years ago, The Vintage Dressmaker blogged about 1920s clothing construction and included a discussion of the foundation linings. My thanks to her for the following three images, which are from her most informative post.

 A two-piece dress from the 1920s:


The same dress with the blouse removed, showing a drop-waist camisole lining with the skirt attached.

This image is a built-up foundation waist lining with front closing.


 In her post, the Vintage Dressmaker links to the Detroit Historical Museum website (source for the following two images) as a further resource for examples of foundation linings.


When you remove the blouse of the two-piece dress (above), the built-up waist foundation lining is revealed. Note how the skirt is attached with hooks-and-eyes to the built-up waist lining.


Mysteries of 1920s foundation garments revealed! :) A major improvement over corsets, don't you think?

Tuesday, June 3, 2014

History of Sewing: 1920s Foundation Garments - Built-Up Linings

In 1920s fashion, a two-piece dress required a foundation for its skirt. Whether that foundation was a stay belt, a hip yoke, or a lining depended largely on the specific lines of the dress and the material of which it was made. The material of the dress also influenced the material of the foundation, both as to kind and color, for exact matching was much more important if the material is sheer than if it was not.

In this post, I examine the built-up lining more closely, which is more fitted than the camisole.

The built-up lining provides protection to a dress, particularly across the shoulders, or as a skirt foundation. It is also used as a foundation for a dress having a bloused effect.

The built-up lining can be changed in a number of ways to suit your needs:
  • Length:  at normal waistline or at the hip (drop waistline)
  • Neckline: To match the dress
  • Center front opening: add or omit (if omitted, make neckline wide or deep enough so that it is easy to slip the lining over the head).
  • Degree of fit: placement and length of darts or dart-tucks (as illustrated in the following images)


For the average figure, a built-up lining at normal waistline length requires 1-1/8 yards; hip-length requires 1-3/8 yards. You could use a "regulation lining" pattern or plain foundation waist pattern.

As you can see in the images above, the built-up lining is more fitted than a camisole, with vertical tucks, dart-tucks, or darts at the hemline and shoulders in varying lengths. A foundation belt can be attached to the lower edge.


If the lining is to serve as the foundation for a skirt, you would pin the skirt to the hemline of the lining, adjust the fit, basting as you remove the pins (in the image immediately above, this is step "c"). Then you would cover the joining with seam binding or a bias strip of silk, stitching it down along both edges. Alternatively, you could attach the skirt with snaps or hooks-and-eyes (for easy re-use and washing of the lining), if an overblouse is worn over the skirt. In my next post on this general  topic of foundation garments, I'll talk more about this. :)

Monday, May 26, 2014

History of Sewing - 1920s Foundation Garments - Waist Linings

In the 1920s, foundation garments were grouped into two main categories: waistline foundations and lining foundations. The topic of this post is to provide an overview of the lining foundations. And just to be clear, in general, foundation garments is not the same as lingerie, which is a different subject (although when we get into slips, the two subjects blur...).

Waist linings serve as both a protection to a dress (though particularly across the shoulders) as well as a means of holding a dress in its correct position, and as a foundation to which a skirt may be attached.

There are three general types of waist linings:
  • Camisole or bodice lining
  • Built-up or plain-waist lining
  • Close-fitting lining

The camisole lining is simplest to make and was considered optimal for young girls and slender women (and also provides a dainty effect under sheer garments).


The built-up lining is preferable for the woman who is size 42 or larger.


The close-fitting lining is essential for dresses that fit closely on figures of all types, and for many types of dresses intended for the "stout" figure.


For one-piece dresses of sheer fabric (as opposed to two-piece dresses), the lining (regardless of type), should be extended to the full length of the dress as a slip, so as to eliminate a conspicuous break at the waistline.

I'll look more closely at the construction of these 1920s foundations garments in future posts.  Something to look forward to. :)
Thursday, May 22, 2014

History of Sewing: 1920s Undergarments - Waistline Foundations

Waistline Foundations

Are you ready for the next exciting installment in the story of 1920s foundation garments? (I'm sorry; "foundation garments" doesn't sound especially dramatic, does it? :))

In any case, it's the 1920s  and you have a dress with bloused fullness or with draping, or perhaps a skirt, and you need a foundation garment. Choose from the following.

Inside Stay Belts

The inside stay belt is worn under a dress  or skirt (at the normal waistline, above it, or below it, depending on the style). It serves as a stay to hold certain parts of the dress in place. Not all dresses require stay belts. In general, a stay belt would be used in a dress with bloused fullness or with draping, and with some skirts that would be balanced on the stay belt.

Inside stay belts are made of belting (which can be purchased by the yard), or in a sheer dress would be made of narrow self-material or cotton tape. The ends are fastened with hooks and eyes.

There were two types of belting:
  • Unboned belting: Woven in a vertical corded effect (pretty much as the webbing or belting of today). Unboned belting is straight and best for use at the normal waistline.


  • Boned belting: Usually made of percaline or some firmly woven mercerized fabric to which boning has been inserted at regular intervals in the weaving, and can be either straight or shaped (this type of belting is not sold today, but could be constructed). The shaped belting would be worn under garments with a "below normal" waistline or above normal waistline. The shorter curved edge is uppermost for a below normal waistline, with a snug fit over the hips. If the waistline is above normal, the shorter curved edge is worn at the normal waistline, with the longer curve above it.

To create a stay belt: Use the belting itself to measure the desired length, allowing 1/2 to 3/4 inch at each end for a hem. The two hems should just meet but not overlap. Sew on strong hooks and round eyes (rather than straight eyes) one inch apart, using the buttonhole stitch.

Fitted Hip Yokes


The fitted hip yoke was worn to stay bloused fulness below the normal waistline, and may also be used as the yoke for a skirt that is to be worn with a long overblouse or jumper. The yoke is made so that its lower edge is 1/2 to 1 inch below the desired low waistline, so the depth varies according to the design of the garment. The hip yoke on the left in Figure 1, is a relatively shallow one, while the hip yoke on the right is deeper and would be used with a skirt or dress with a very low bloused waistline.

Figure 1

The fitted hip yoke should not be used in a dress of sheer material, but works well in a dress of material that prevents it showing through. The yoke is usually of the dress material or of a lining material.

To make a fitted hip yoke:
  1. Take your measurements at the point on your figure where you want the top of the yoke to be and where you want the bottom of the yoke to be. Be sure to measure the front separately from the back, as you will be cutting separate pieces for the front and back (joining at the sides).
  2. Cut two strips of muslin, using the measurements plus 2 inches for each piece.
  3. Fit each yoke piece to your figure:
  4. Figure 2

    1. Subtract the front waistline measurement from the front hipline measurement, and then divide that difference into two parts.
    2. In the yoke front piece, create two darts between the center and the sides, each dart taking up half the amount of the difference identified in the previous step. (illustration a, in Figure 2)
    3.  Divide the back section into seven equal parts, first marking off one inch at each end for the seams, and then put a pin at each division point, or six pins in all. The center line will coincide with the center of one of these parts.
    4. Subtract the back waistline measurement from the back hip line measurement, and then divide that difference by six.
    5. Create darts at each pin that combine to reduce the back waistline by the difference identified in the previous step. (illustration b in Figure 2)
    6. With darts basted, try on  the two muslin pieces, with center front and back in their proper locations, pinning them at the sides with a 1-inch seam over each hip. 
    7. If more fitting is needed at the waistline, deepen the side seams at the top, or deepen or decrease the darts, keeping the line of each properly vertical.
    8. Mark the side seams and press the darts flat.
  5. Using the muslin itself as a pattern (or create a paper pattern from the muslin), cut two of each yoke piece from the yoke fabric. The yoke is usually made double because this provides increased strength and makes a neat finish possible.
  6. Sew the right hip seams of the yoke and of the lining.
  7. Trim the seams to 3/8-inch and press open.
  8. Place the yoke and lining right sides together, and stitch  1/4-inch from the edge along the top, bottom and along the end of the back section.
  9. Turn right side out and press. 
  10. Finish the free end of the front section with a 3/4-inch hem, turned so that the outer fold comes directly on the seam line. Trim away the lining seam allowance to remove bulk.
  11. Stitch the other end of the yoke through both thicknesses 3/4-inch from the edge, and this 3/4-inch as the extension for the closing. 
  12. Top-stitch the upper and lower edges, and sew snaps to the opening (as illustrated in Figure 1).
  13. Turn right side out and press.
Got that? :) Next installment: Waist linings!

Tuesday, May 20, 2014

History of Sewing - Introduction to 1920s Foundation Garments

You know that the women of the 1920s obtained freedom from dreadful corsets with stays of whalebone and tight lacing. What you may not know is that they did not abandon "foundation garments" altogether.

There were several types of women's foundation garments in the 1920s. The foundation garment served to retain the correct lines in a garment. Which foundation garment was worn depended largely on the specific lines of the garment and the material of which it was made.

The foundation garments were grouped into two general classes: waistline foundations and lining foundations.
Waistline foundations consisted of two types:
  • Inside stay belts
  • Fitted hip yokes

 Lining foundations consisted of four types:
  • Camisole or bodice lining
  • Built-up or plain-waist lining
  • Close-fitting lining
  • Foundation slips


In future posts, I will delve into more details about these undergarments. Stay tuned!

Monday, March 3, 2014

History of Sewing - 1940s Introduction of Numbered Notches

In this flyer from 1941, the McCall pattern company explains that they have started numbering the notches on their pattern pieces to simplify assembly of garments.

Not only do you match up notches by numbers, but you match them in the order in which they should be joined! Note that this is patented and exclusive to McCall.


Thursday, February 14, 2013

History of Sewing - 1960s Vintage Pattern Sizes and Body Types

 At the end of the 1950s, seamstresses hopefully had adjusted to the "new sizing" changes that occurred in the mid-late 1950s. But in the 1960s, more changes are afoot. New figure types will be added (junior petite and chubbie girls), some figure types will be merged (sub-teen or pre-teen and teen become young junior/teen), and at the end of 1967 another complete sizing shift will occur.


Revisiting the End of the 1950s

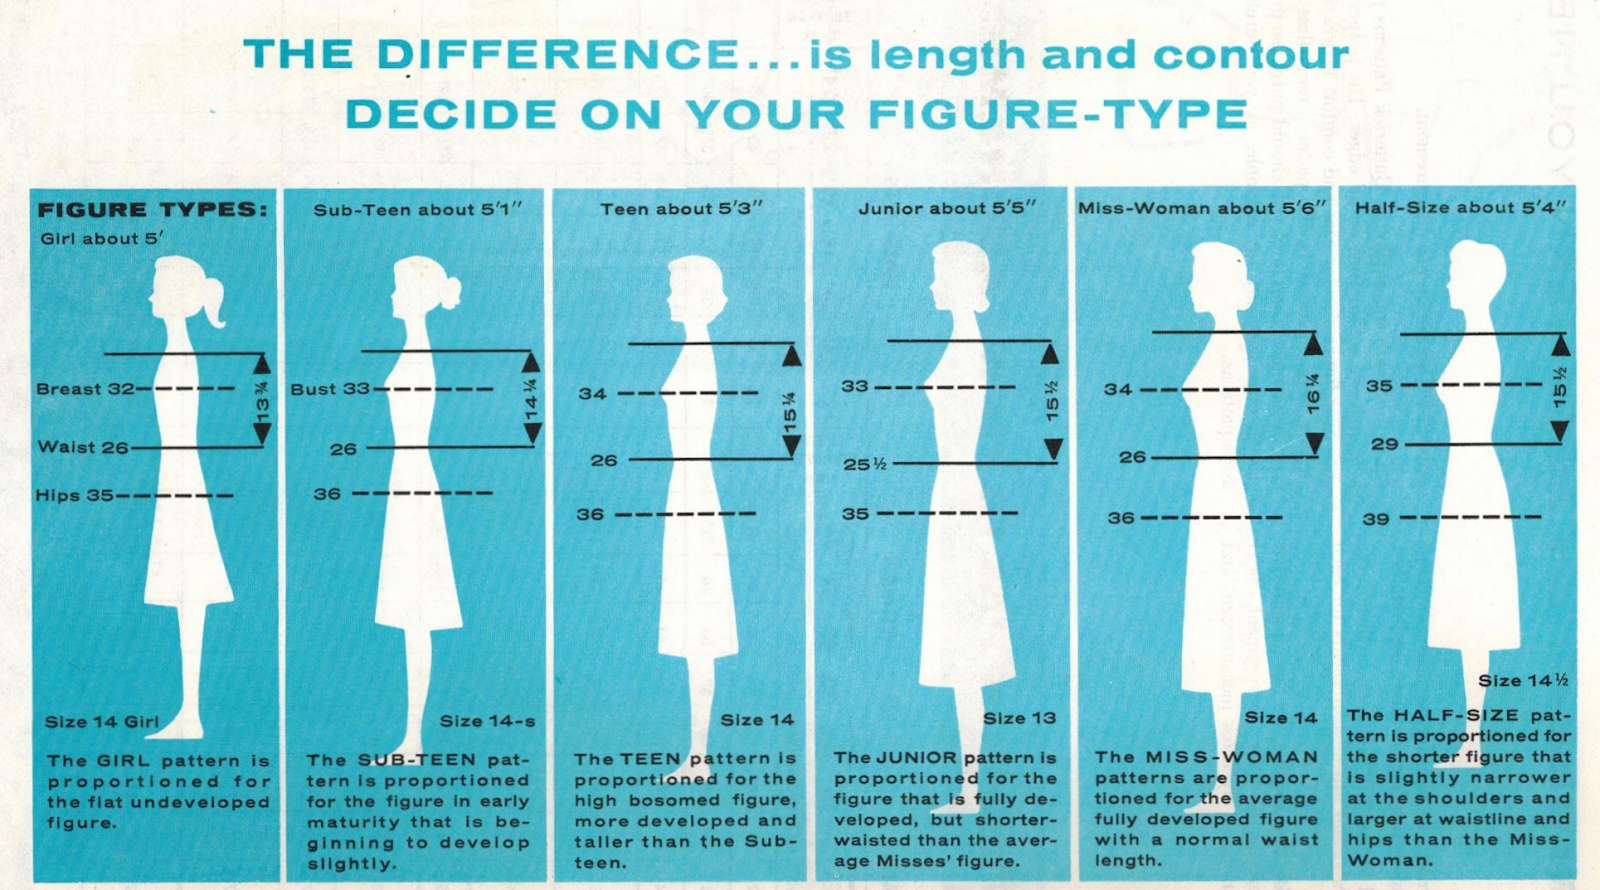
To refresh your memory (if you don't want to review my post on 1950s pattern sizes),  here are pattern sizes from a 1959 Butterick Sewing Book. Note that there are separate pattern sizes for sub-teen, teen, junior, miss, woman, and half sizes. Note also that the Junior figure type IS considered a fully-developed (or mature) figure type, not a youthful (that is, teen-like) size. The Junior figure is simply relatively higher-busted and shorter-waisted than the Miss figure type (and maybe a tad shorter).


 Early and Mid 1960s

Although sizing from the end of the 1950s through the mid-1960s remains consistent, note that the sizes are NOT consistent from one pattern maker to another. Compare the Butterick sizes above, with those from Vogue (Vogue Sewing Book dated 1964) (Note that the "New Sizing" referred to here are the size changes from the late 1950s.):


McCall's Easy Sewing book from 1964 provides sizes and figure types similar to those of Butterick, but replaces Sub-Teen with Pre-Teen, and adds the Junior Petite figure type:


And in 1966, McCall's sizes are still the same. This McCall's Step-by-Step Sewing Book provides a nice comparison of the Misses figure type with each other type.


1967 - Time to Change to New Sizes!

In late 1967 sizes change yet again!!! Effective November 1, 1967, pattern companies made the shift to new sizes developed and approved by the Measurement Standard Committee of the Pattern Fashion Industry. The pattern sizing change was made to correspond more closely with standard ready-to-wear sizing (at that time). Was access to better or more food a factor in the size changes of the late 50s and this change in the late 1960s? A good topic for research and discussion!

The sizes affected Misses, Women's, Half-Size, Junior, and Junior Petite. Teen and Pre-Teen sizes were replaced with a new size range - Young Junior/Teen.

Sizes essentially shifted downwards. For example, for the Misses figure type with bust 34, the size changed from 14 to 12. The ratio of hip to bust remains the same (bust 34, hip 36), but the waistline is reduced by a half inch (a full inch for some sizes): Before: bust 34, waist 26, hip 36 - After: bust 34, waist 25-1/2, hip 36.

McCall's Step-by-Step Sewing Book from 1968 does a great job providing a comparison of the former sizing with the new:


And here are the "new sizes" as published in a Simplicity Sewing Book from 1968, which includes a  "Chubbie" figure type for girls: